 image.png
How to share folders and files in Qubes OS
A practical solution to share folders between Qubes OS qubes.
The Qubes shared folders project is now live on Github. This program lets you access and manage folders and files stored in one qube from any other qube on your machine, as if the files were local to the qube. No networking, server or firewall setup is necessary to use it, and access can be revoked at any time.
The link above contains installation instructions, and a link with prebuilt packages are available at the bottom of the page. Here we will cover just a small primer on how to use it, once the program is properly setup on your Qubes OS machine.
Standard Qubes file copy/move vs. this
Qubes OS ships with a great facility that lets you copy files and folders, one by one, from/to different qubes. This is phenomenal for when you want to work on a specific file.
It's not so good when you need to work with large folders that contain many files, like a file server full of documents, or a Git repository, or simply a sizable media collection. You can't be expected to e.g. copy one song to a VM prior to listening to it — and the alternative is not much better, often involving granting networking access to the qube that needs to access the files, and perhaps running a full file server as well.
For that use case, you can simply use Qubes shared folders instead.
How do shared folders work?
Shared folders work surprisingly like any other network share — you have your server VM where the files are stored, and then on your client VM where you'll use the files, you mount the shared folder from server. After mounting, all files within the mounted folder are available on the client VM.
You don't even need to set up any shares on the server VM. It's all automatic.
Connect to a folder in another qube
To mount /home/user from the server VM onto /home/user/mnt, run the following on a terminal of client:
cd /home/user
mkdir mnt
qvm-mount-folder server /home/user mnt
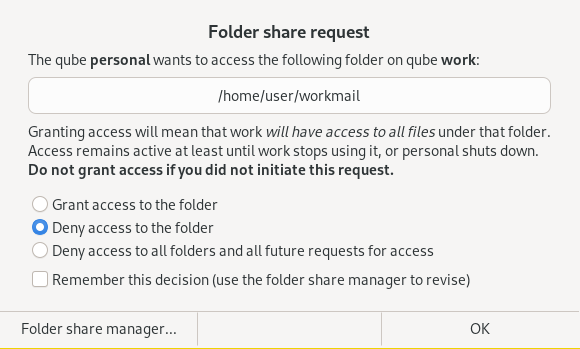
At this point you will see an authorization message from dom0 asking you if you really want to give client access to server's files.

This access can be denied one-time or perpetually, and it can also be granted one-time (for the duration of the mount) or permanently. Note that the access granted is limited to the requested folder and all subfolders (modulo file permissions on the shared folder) and, once granted, access lasts until the server qube is shut off, or the client qube unmounts the shared folder.
Authorize the access by confirming the name of the qube (server) on the dialog and continuing.
Presto. You should be able to use a file manager, a terminal, or any of your favorite applications to use files in /home/user/mnt -- these files are all stored in server on folder /home/user.
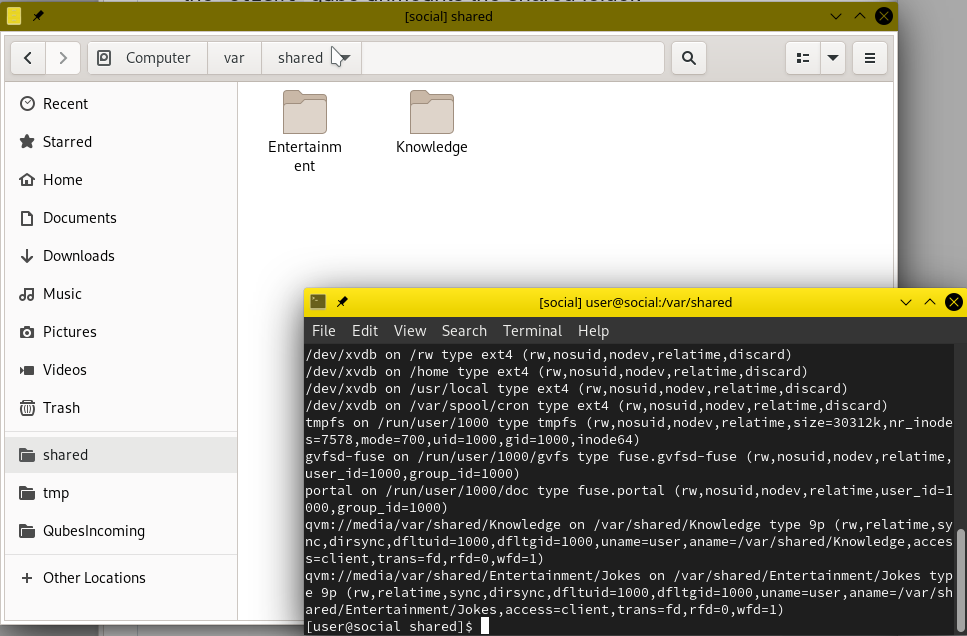
Here is an example of a VM with two shared folders mounted from the network — you'll see they look exactly like any other folder on the system.

You might find it interesting to know that the server VM involved in these shares (not depicted in the photo) doesn't actually store these two folders — it simply has them mounted from an NFS server — so this program works just fine when sharing both local files as well as network mounts.
Disconnect from the folder
To finish using it, run sudo umount /home/user/mnt.
You can also power off the client VM. The share will then be automatically unmounted.
In case of error
If your server qube shuts off before you unmount the mounted share, you'll see I/O errors on the client qube whenever you attempt to access the mounted share. You can always unmount the errored folder to resolve the issue.
More information
Please be careful in which context you use this software. The software used to transport the files between VMs (diod) has not had a security review.
To read more documentation, including how to manage persistently-granted file shares, please see the project's documentation.
Prebuilt packages are available here. The documentation indicates how to install the packages.
 image.png
 Screenshot_20220529_234552.png

