 Screenshot_20221121_223819.jpg
Cooking with Home Assistant!
Today you'll learn how to have Home Assistant assist you during steak cooking, oven use, pot roast preparation, and anything that requires you getting the temperature just right.

Cooking is fun — and the result is often delicious. It's also no secret that cooking requires some level of precision... especially for dishes that require accurate temperature measurement. In this installment, you'll learn how to spend less time paying attention to your thermometers, while not skipping a beat when your food is either ready or inching dangerously outside its temperature envelope.
What we'll cook today
We'll build a temperature alert system. This system will have three modes:
- Upper threshold — alert when temperature crosses downward.
- You'll get notified once when a foodstuff cools below a set temperature.
- Useful to find out when something has cooled in your fridge or counter for long enough.
- Lower threshold — alert when temperature reaches upward.
- You'll get notified once when a foodstuff goes over a set temperature.
- Useful for steaks and other foodstuffs that must reach a known internal temperature.
- Range thresholds — alert if temperature falls outside of range.
- You'll get notified when a foodstuff goes below or above two temperature thresholds.
- Useful for long cooking sessions on grills / ovens when you are targeting a specifc temperature, whose temperature may vary over time, and you'd like to make adjustments every once in a while without having to check the grill / oven thermometer constantly.
Ingredients
Here's what you'll need, already ready to go:
- 1 Home Assistant, properly operating.
- 1 thermometer, already wired up to Home Assistant, and operational.
- In my case, I opted for an INKBIRD / BBQ GO thermometer, plus an ESPHome proxy to feed the temperatures from the thermometer into Home Assistant.
- If your Home Assistant already has Bluetooth setup, or you already have a thermometer, you're good to go.
- 1 Node-RED, with a Home Assistant companion extension already properly setup, and an up-to-date
node-red-contrib-home-assistant-websocketdeployed in Node-RED.- The brains of the operation will be done in Node-RED.
The prep
What you need to do in Home Assistant
Target input helper
First, you're going to create a target input helper. This input helper will let you type in the target temperature — or temperature range — that your thermometer must reach or maintain in order for Home Assistant to do its thing.
Go to Settings, then hit Devices & Services. Select the Helpers tab. Push the + Create Helper button. In the popup that appears, select Text. Give it a name — in my examples I'll name it Kitchen cooking temperature probe 1 target., which gives it a nice entity ID of input_text.kitchen_cooking_temperature_probe_1_target. Make sure to add the following regex pattern for client-side validation in the respective box: ^((-|)([0-9]+([.][0-9]+|)))(|-([0-9]+([.][0-9]+|)))$ — this gibberish prevents you from typing anything other than a straight number or a range of numbers separated by a dash (-). Optionally, assign it to your desired area and give it an icon; I gave mine the icon mdi:thermometer-check.
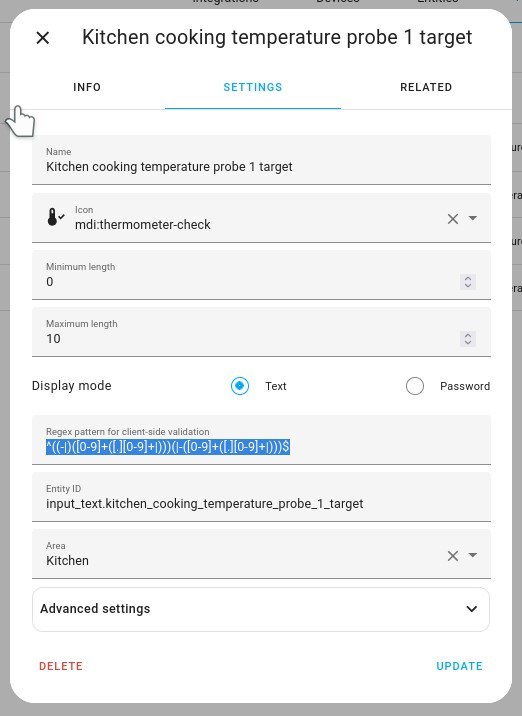
Your target input helper is ready.
Now a bit of mise en place: take note of both the entity ID of your input helper, as well as the entity ID of your thermometer. The entity ID of my thermometer is sensor.kitchen_cooking_temperature_probe_1.
With this accomplished, we can move to Node-RED.
The Node-RED side
State change nodes
What you're going to do in Node-RED is start with the following flow:
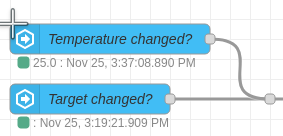
These two nodes are events: state nodes — and they will be your data sources. The top-most one emits events when your temperature changes, so select your thermometer / probe as the entity for it. The bottom-most one emits events when your input helper for the target changes, so select the input helper entity you create before. Check all the Current state... boxes in both nodes, and connect their outputs in parallel to a junction.
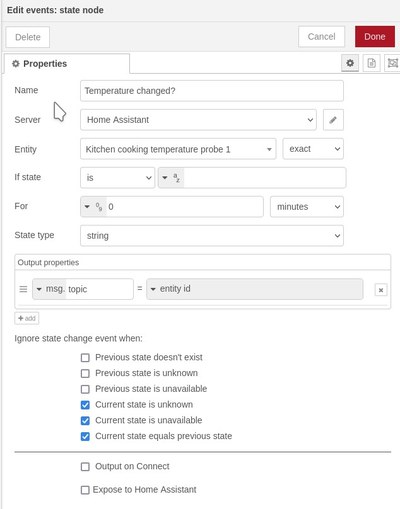
The state machine
Here comes the magic sauce: the state machine.

The state machine's job is to observe both the target and the temperature, and take action depending on whether the temperature has gone through the threshold(s) defined in your target. When you modify your target to set a temperature, if your thermometer is online, the state machine will immediately become active and begin tracking the progress of the thermometer towards your desired temperature. Alternatively, if you set a temperature range, then you'll get alerted every time your thermometer goes outside that range.
Copy this node code into your Node-RED instance, then connect the output of the current target node into the new state machine node:
[
    {
        "id": "3f74d233985c5b7a",
        "type": "function",
        "z": "01a2a01f208f82a3",
        "name": "state machine",
        "func": "// Remember code\nif (msg.temp !== undefined) {\n    // FIXME: document these tolerances.  Some thermometers\n    // give off absurd temperatures when first started.\n    if (Number(msg.temp) > 400 || Number(msg.temp) < -50) {\n        node.warn(\"Impossible temperature \" + msg.temp);\n    } else {\n        context.set(\"temp\", msg.temp);\n    }\n}\nif (msg.target !== undefined) {\n    context.set(\"target\", msg.target);\n}\nmsg.temp = context.get(\"temp\") || \"unavailable\";\nmsg.target = context.get(\"target\") || \"\";\n//node.status(\n//    \"Temp \" + msg.temp + \" target \" + msg.target + \", last updated \" + (msg.temp !== undefined ? \"temp\" : \"target\")\n//)\n// return msg;\n\n// Process code\nconst targetre = /^((-|)([0-9]+([.][0-9]+|)))(|-([0-9]+([.][0-9]+|)))$/\nvar state = context.get(\"state\") || \"off\";\nvar target = msg.target;\nvar target_changed = context.get(\"old_target\") != target;\ncontext.set(\"old_target\", target)\nvar temp = isNaN(Number(msg.temp)) ? null : Number(msg.temp);\n\nfunction getThresholds(tgt) {\n    try {\n        var res = tgt.match(targetre);\n        var first = res[1];\n        var second = res[6];\n    } catch (e) {\n        return null;\n    }\n    if (first == \"\") {\n        return null;\n    }\n    first = Number(first);\n    if (isNaN(first)) {\n        return null;\n    }\n    if (second == \"\" || second === undefined || second === null) {\n        return [first];\n    }\n    second = Number(second);\n    if (isNaN(second)) {\n        return null;\n    }\n    if (first >= second) {\n        return null;\n    }\n    return [first, second];\n}\n\nmsg.payload = null;\n\nfunction dispatch(m, entitystate) {\n    node.status(m);\n    msg.payload = entitystate;\n    msg.comment = m;\n    return msg;\n}\n\nif (target_changed) {\n    if (target == \"\") {\n        context.set(\"state\", \"off\");\n        return dispatch(\"Temperature / range empty\", \"target off\");\n    }\n    var thresholds = getThresholds(target);\n    if (thresholds == null) {\n        context.set(\"state\", \"off\");\n        return dispatch(\"Target temperature / range not valid: \" + target, \"invalid target\");\n    } else if (thresholds.length == 1) {\n        var threshold = thresholds[0];\n        var diff = threshold - temp;\n        if (diff > 0) {\n            context.set(\"state\", \"waitpos\");\n            context.set(\"threshold\", threshold);\n            dispatch(\"Waiting until temperature rises to \" + threshold + \"° (\" + Math.abs(diff).toFixed(2) + \"° more to go)\", \"waiting\");\n        } else if (diff < 0) {\n            context.set(\"state\", \"waitneg\");\n            context.set(\"threshold\", threshold);\n            dispatch(\"Waiting until temperature drops to \" + threshold + \"° (\" + Math.abs(diff).toFixed(2) + \"° more to go)\", \"waiting\");\n        }\n    } else if (thresholds.length == 2) {\n        var lower = thresholds[0];\n        var upper = thresholds[1];\n        context.set(\"state\", \"band\");\n        context.set(\"lower\", lower);\n        context.set(\"upper\", upper);\n        dispatch(\"Ensuring temperature stays between \" + lower + \"°\" + \" and \" + upper + \"°\", \"waiting\");\n    }\n}\n\nif (temp == null) {\n    dispatch(\"Temperature unavailable\", \"sensor off\");\n} else {\n    if (state == \"waitpos\") {\n        diff = temp - context.get(\"threshold\");\n        if (diff >= 0) {\n            context.set(\"state\", \"off\");\n            return dispatch(\"Target \" + target + \"°\" + \" reached at \" + temp + \"°\", \"above target\");\n        } else {\n            return dispatch(\"Waiting until temperature rises to \" + context.get(\"threshold\") + \"° (\" + Math.abs(diff).toFixed(2) + \"° more to go)\", \"waiting\");\n        }\n    } else if (state == \"waitneg\") {\n        diff = temp - context.get(\"threshold\");\n        if (diff <= 0) {\n            context.set(\"state\", \"off\");\n            return dispatch(\"Target \" + target + \"°\" + \" reached at \" + temp + \"°\", \"below target\");\n        } else {\n            return dispatch(\"Waiting until temperature drops to \" + context.get(\"threshold\") + \"° (\" + Math.abs(diff).toFixed(2) + \"° more to go)\", \"waiting\");\n        }\n    } else if (state == \"band\") {\n        if (temp > context.get(\"upper\")) {\n            if (context.get(\"warned\") !== true) {\n                context.set(\"warned\", true);\n                return dispatch(temp + \"°\" + \" above \" + context.get(\"upper\") + \"°\", \"above maximum\");\n            }\n        } else if (temp < context.get(\"lower\")) {\n            if (context.get(\"warned\") !== true) {\n                context.set(\"warned\", true);\n                return dispatch(temp + \"°\" + \" below \" + context.get(\"lower\") + \"°\", \"below minimum\");\n            }\n        } else {\n            context.set(\"warned\", false);\n            return dispatch(temp + \"°\" + \" between \" + context.get(\"lower\") + \"°\" + \" and \" + context.get(\"upper\") + \"°\", \"within range\");\n        }\n    }\n}\n\nif (msg.payload !== null) {\n    return msg;\n}",
        "outputs": 1,
        "noerr": 0,
        "initialize": "",
        "finalize": "",
        "libs": [],
        "x": 420,
        "y": 2200,
        "wires": [
            [
                "2446bab6cdc8c427"
            ]
        ],
        "outputLabels": [
            "state"
        ]
    }
]
Read the code inside the state machine.
Code inside the state machine
// Remember code
if (msg.temp !== undefined) {
    // FIXME: document these tolerances.  Some thermometers
    // give off absurd temperatures when first started.
    if (Number(msg.temp) > 400 || Number(msg.temp) < -50) {
        node.warn("Impossible temperature " + msg.temp);
    } else {
        context.set("temp", msg.temp);
    }
}
if (msg.target !== undefined) {
    context.set("target", msg.target);
}
msg.temp = context.get("temp") || "unavailable";
msg.target = context.get("target") || "";
//node.status(
//    "Temp " + msg.temp + " target " + msg.target + ", last updated " + (msg.temp !== undefined ? "temp" : "target")
//)
// return msg;

// Process code
const targetre = /^((-|)([0-9]+([.][0-9]+|)))(|-([0-9]+([.][0-9]+|)))$/
var state = context.get("state") || "off";
var target = msg.target;
var target_changed = context.get("old_target") != target;
context.set("old_target", target)
var temp = isNaN(Number(msg.temp)) ? null : Number(msg.temp);

function getThresholds(tgt) {
    try {
        var res = tgt.match(targetre);
        var first = res[1];
        var second = res[6];
    } catch (e) {
        return null;
    }
    if (first == "") {
        return null;
    }
    first = Number(first);
    if (isNaN(first)) {
        return null;
    }
    if (second == "" || second === undefined || second === null) {
        return [first];
    }
    second = Number(second);
    if (isNaN(second)) {
        return null;
    }
    if (first >= second) {
        return null;
    }
    return [first, second];
}

msg.payload = null;

function dispatch(m, entitystate) {
    node.status(m);
    msg.payload = entitystate;
    msg.comment = m;
    return msg;
}

if (target_changed) {
    if (target == "") {
        context.set("state", "off");
        return dispatch("Temperature / range empty", "target off");
    }
    var thresholds = getThresholds(target);
    if (thresholds == null) {
        context.set("state", "off");
        return dispatch("Target temperature / range not valid: " + target, "invalid target");
    } else if (thresholds.length == 1) {
        var threshold = thresholds[0];
        var diff = threshold - temp;
        if (diff > 0) {
            context.set("state", "waitpos");
            context.set("threshold", threshold);
            dispatch("Waiting until temperature rises to " + threshold + "° (" + Math.abs(diff).toFixed(2) + "° more to go)", "waiting");
        } else if (diff < 0) {
            context.set("state", "waitneg");
            context.set("threshold", threshold);
            dispatch("Waiting until temperature drops to " + threshold + "° (" + Math.abs(diff).toFixed(2) + "° more to go)", "waiting");
        }
    } else if (thresholds.length == 2) {
        var lower = thresholds[0];
        var upper = thresholds[1];
        context.set("state", "band");
        context.set("lower", lower);
        context.set("upper", upper);
        dispatch("Ensuring temperature stays between " + lower + "°" + " and " + upper + "°", "waiting");
    }
}

if (temp == null) {
    dispatch("Temperature unavailable", "sensor off");
} else {
    if (state == "waitpos") {
        diff = temp - context.get("threshold");
        if (diff >= 0) {
            context.set("state", "off");
            return dispatch("Target " + target + "°" + " reached at " + temp + "°", "above target");
        } else {
            return dispatch("Waiting until temperature rises to " + context.get("threshold") + "° (" + Math.abs(diff).toFixed(2) + "° more to go)", "waiting");
        }
    } else if (state == "waitneg") {
        diff = temp - context.get("threshold");
        if (diff <= 0) {
            context.set("state", "off");
            return dispatch("Target " + target + "°" + " reached at " + temp + "°", "below target");
        } else {
            return dispatch("Waiting until temperature drops to " + context.get("threshold") + "° (" + Math.abs(diff).toFixed(2) + "° more to go)", "waiting");
        }
    } else if (state == "band") {
        if (temp > context.get("upper")) {
            if (context.get("warned") !== true) {
                context.set("warned", true);
                return dispatch(temp + "°" + " above " + context.get("upper") + "°", "above maximum");
            }
        } else if (temp < context.get("lower")) {
            if (context.get("warned") !== true) {
                context.set("warned", true);
                return dispatch(temp + "°" + " below " + context.get("lower") + "°", "below minimum");
            }
        } else {
            context.set("warned", false);
            return dispatch(temp + "°" + " between " + context.get("lower") + "°" + " and " + context.get("upper") + "°", "within range");
        }
    }
}

if (msg.payload !== null) {
    return msg;
}
The alert sensor
Finally, you'll have to create a an alert sensor entity directly in Node-RED, which derives its State from the msg.payload property, and accepts various attributes sent from the state machine.
- Add a new sensor from the home assistant entities collection of nodes.
- Under Entity config, make sure Add new ha-entity-config... is selected, then click the pencil icon.
- In that screen, give the entity the name you'd like (example: Kitchen cooking temperature probe 1 alert).
- Give it the exact same Friendly name.
- Select type Sensor. Now click on the pencil icon in that window, to open the ha-device-config dialog.
- In the ha-device-config dialog, give the device the exact same name as the entity name.
- Click Add. This takes you back.
- If you want, add an icon for the entity. I chose
mdi:thermometer. - In unit of measurement, add your thermometer's units (example to copy and paste: °C)
- Check the box Resend state attributes!
- Click on Add. This takes you back again.
- Under Attribute Key / Properties, click add attribute.
- In the newly-appeared row, box to the left, type
comment. - Box to the right, select J: Expression from the dropdown, and type
msg.commenton the text field.
- In the newly-appeared row, box to the left, type
- Click Done.
You have your entity now. Here is how your whole network looks like, once the alert entity has been added:

And back to Home Assistant
Go back to your Home Assistant automatic dashboard. You should see two new entities in your dashboard. Here is a sample of two sets of probes, targets and alerts (my thermometer is dual-head so I doubled everything up) grouped under my kitchen area for convenience:
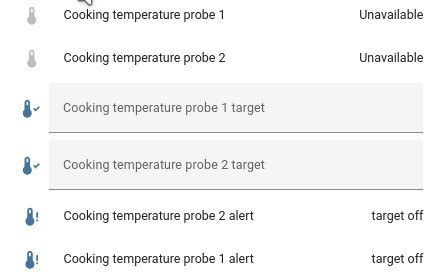
Here we have the temperature probe, the target (right now an empty box), and the alert. The probe is the physical thermometer, the target is the input helper we created in Home Assistant, and the alert is the sensor we created through Node-RED. You'll note that my own thermometer is off right now, so the probe shows as unavailable. The target box is empty too, and as a consequence of that, the alert shows as target off — which is exactly correct; if it had anything typed on it, then the alert would show as sensor off.
As soon as you turn your thermometer on, type in a number for the probe, and hit ENTER or focus out of the box, you'll see the alert go into one of the following states:
- Invalid target. This happens when you type a non-number in the target box.
- Waiting. The state machine is waiting for the temperature to reach its condition.
- This will depend on whether you set a target temperature higher or lower than current thermometer temperature.
- If target is lower, then the state machine will wait until the temperature goes down.
- If target is higher, then the state machine will wait until the temperature goes up.
- If target is a range (separated by a dash), then the state machine will observe if the temperature is within range or outside the range.
- Above target. The thermometer has gone up and reached the target temperature.
- Below target. The thermometer has gone down and reached the target temperature.
- Above maximum. The thermometer has gone above the upper range of the target temperature range.
- Below minimum. The thermometer has gone below the lower range of the target temperature range.
- Within range. The thermometer is within the upper and lower boundaries of the target temperature range.
Good news! Since our flow is complete, and we now know what the new sensor will say in every case, we can create our alerting automation now.
Getting alerted
The alerting automation
We're going to create an automation now. In Settings, go to Automations & Scenes. Create a new automation, and switch to YAML editing mode, then paste this code, with suitable modifications for your alert entity's ID:
alias: "Kitchen: alert when temperature probes overcome their targets"
description: ""
trigger:
  - platform: template
    value_template: |-
      {%
        if "above" in states("sensor.kitchen_cooking_temperature_probe_1_alert")
        or "below" in states("sensor.kitchen_cooking_temperature_probe_1_alert")
      %}true{% endif %}
    id: sensor1
  - platform: template
    value_template: |-
      {%
        if "above" in states("sensor.kitchen_cooking_temperature_probe_2_alert")
        or "below" in states("sensor.kitchen_cooking_temperature_probe_2_alert")
      %}true{% endif %}
    id: sensor2
condition: []
action:
  - service: notify.notify
    data_template:
      title: Cooking alert
      message: >
        Temperature probe {%
          if trigger.id == "sensor1"
        %}1 is {{ states("sensor.kitchen_cooking_temperature_probe_1_alert")
        }}{%
          else
        %}2 is {{ states("sensor.kitchen_cooking_temperature_probe_2_alert")
        }}{%
          endif
        %}.
mode: single
This is a fairly simple automation! All it does is check whether the word above or the word below is in the text of the alert sensor. If so, then fire an alert. If you'd like to also be alerted when your thermometer enters a target temperature range, you can modify the templates to check for the word within.
What other possibilities are there?
The state machine has built-in logic to prevent situations that would cause alerts to fire multiple times unnecessarily (e.g. your target is 50, then your thermometer measured 51, then 52). This logic is active when the target is in threshold temperature mode, and disables the sensor from reporting anything further once the threshold is met; you can reset the logic by making a change to the target. When in range threshold temperature mode, the sensor remains open and alerts when the temperature goes outside the range. Finally, you can turn the sensor off altogether by simply emptying the target box.
You can, of course, modify the action to have your home audio system alert you via text-to-speech or a distinctive tune. If you have a more connected home, you can also turn off the grill, the gas, the ranges or the oven — or switch your appliance to a warming-only mode. The sky is the limit.
Super pro cooking-by-thermometer tip!
Keep this in mind at all times: when your thermometer says your food has reached a certain internal temperature, that internal temperature will almost always continue to rise, as the thermal mass from the outside of the food and the appliance makes its way into the center... yes, even if you turn off the heat. So adjust your thresholds accordingly!
The plating
So how does this look like in the end?
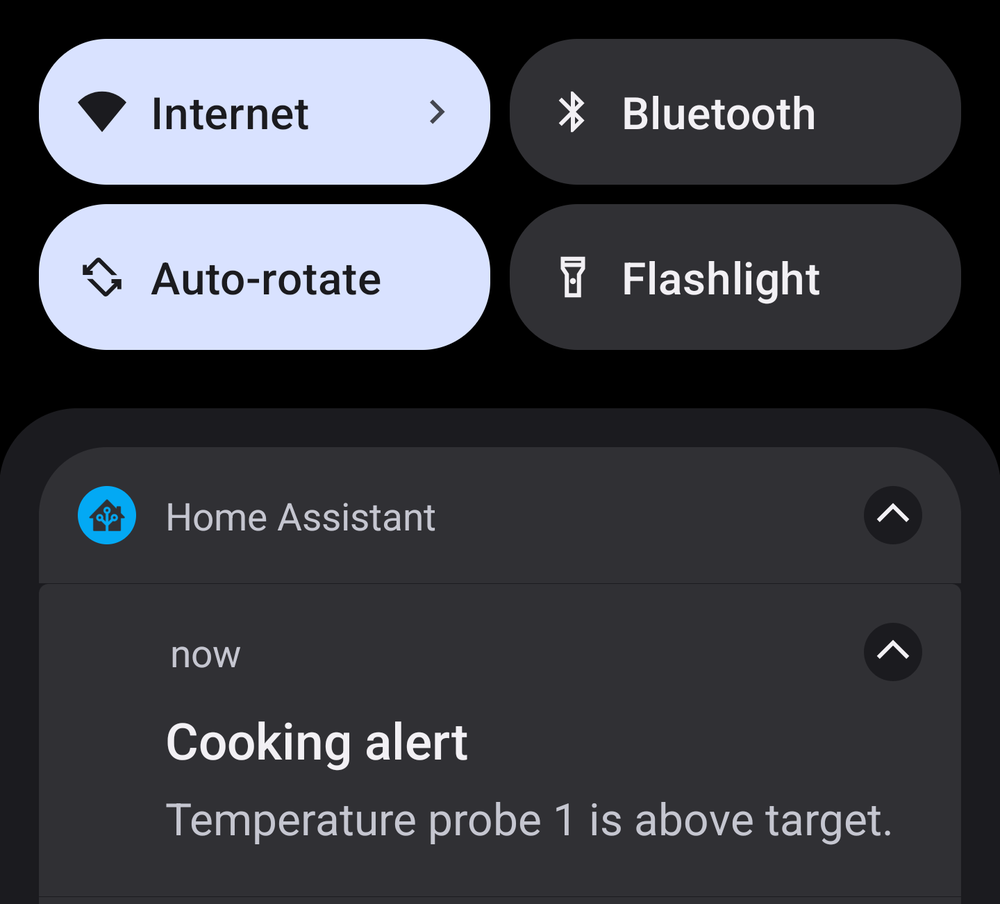
Here is a 4cm thick steak I made by setting the threshold to 56 °C:

Not bad, eh?
Enjoy your dinner with Home Assistant!


