Combating banner blindness with WordPress


Banner blindness. The nemesis of online publishers. Interstitials, popups, floating ads, animations, video advertising, Flash ads. All of them are hated by users, and do more harm than good. If only there was a better way.
Well, maybe there is.
Today, we’ll explore how to increase ad coverage without cramming many ads — and help you exploit your content to the max. We’ll use Google AdSense, WordPress and the Intelligent content ad insertion plugin as examples — the reason I’ll use them to showcase is simplicity — but the two concepts we’re about to discuss are sound:
- Positioning
- A/B testing
Inserting advertisements on WordPress sites: a primer
Inserting advertisements in WordPress blogs is usually accomplished by a combination of these techniques:
- Template editing
- Sidebar box configuration
- Engine enhancement (via plugins)
Template editing
Template editing is rather straightforward. You pick one of the template files, paste the ad code in the position you want them to appear, and there you go. Since WordPress template files are PHP files, you can program complicated rotating schemes and whatnot; nevertheless, it’s not easy, especially for beginners. This technique is also clumsy and limited: you don’t get the opportunity to mingle ads with content. Plus, placing ads on rotating positions is rather hard and convoluted, so 99.9% of the ads placed in this fashion remain static in only a few select positions.
Sidebar ads
Sidebar box configuration is rather easier. Whether it’s one of the basic HTML boxes you can set ad code with, or other ad rotator plugins, you basically enter the WordPress administrative interface, set the boxes up, and paste the ad code. Again, you’re even more limited in placement options, because this techinque is usually limited to the sidebar.
Engine modification
Engine modification via plugins is a bit harder. There are a few plugins that do the job (some good, some bad), and (unlike the previous two) this technique gives you the option of actually mingling ads and content. However, almost all of the plugins with this capability out there require you to manually position advertising slots inside the post content. Doing that for 3000 posts (on a medium-to-large blog, for example) is out of the question.
In this installment, we won’t explore template editing or sidebar box configuration — those topics have been explored till exhaustion and I assume you’ve already done that (you know, that’s the low-hanging fruit). We also won’t be writing any plugins that require manual intervention.
We want zero effort. And we’ll accomplish it. Keep reading to find out how.
An introduction to the Intelligent content ad insertion plugin
Before we dive into the two optimization techniques on this article, let me quickly introduce a plugin that we’ll be using.
The Intelligent content ad insertion plugin for WordPress is a rather straightforward plugin. You install and activate it, paste ad code on two boxes, then tweak the options to suit your actual publishing scenario.
After the code has been pasted, here’s how one of your posts could look like:
The two selling points of this plugin are rather basic but surprisingly overlooked:
- It inserts ads directly into the content. No intervention required from the author.
- It allows (through its ability to execute PHP) for complex rotation and testing setups.
Why are these key points so important? Keep reading to find out.
Key point #1: Positioning
How do you combat banner blindness? Naturally, through better positioning. The standard tips apply:
- Ads “above the fold” (in the first screenful) get clicked more.
- The closer to the content an ad is, the higher the probability it will be clicked.
- Mingle ads to attractive portions of the page.
- Ads above the 50% scroll mark are clicked comparatively more than those below the 50% scroll mark.
So, you’d think that editing your WordPress template and pasting ads above the fold and in all the key places would suffice.
It doesn’t. Why? Because people gloss over the ads not placed inside the content. And you can’t place an ad directly in the content by editing the template (much less editing the sidebar).
Clicks go where eyes go
And why is placing ads directly in the content that important?
Because ads directly in the content get much higher click rates than ads placed surrounding the content. It’s a basic human fact that ads that follow the path of the eyes get seen more. It’s another basic fact that people don’t read online — they scan. Combine these two and you’ll understand why it’s so important to place ads within the content.
Trust me. I doubled my clickthrough rate just by moving ads into the content.
The Intelligent content ad insertion plugin for WordPress has been explicitly engineered towards this goal. It only places two ads:
- The first one goes right below the first paragraph (or “more” WordPress comment) of your post. If you bait a visitor into the introductory paragraph of one of your posts, you’ve pretty much guaranteed he’ll see at least that ad.
- The second one gets injected right in the middle of your content (technically, between the two midmost paragraphs of your post). If your reader is actually reading the article (and most people don’t abandon the article until after the 50% mark), he’ll see the second ad.
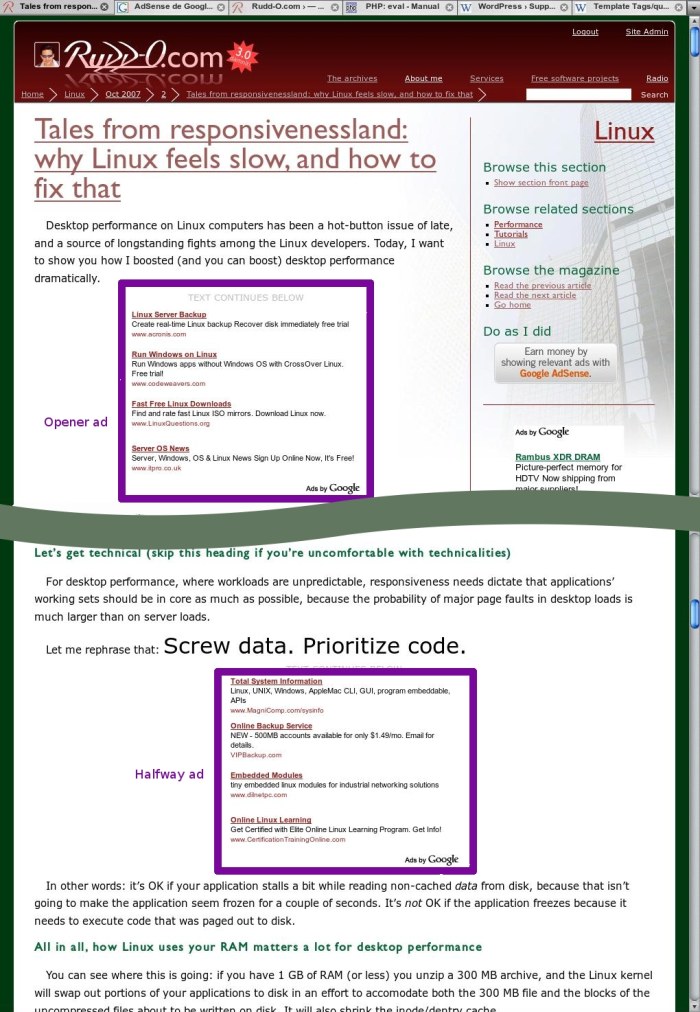
An example of in-content ad positioning
Let’s review the image example above. Notice where the ads are positioned? Does it match our expectations?
It’s noteworthy that the second ad is limited to posts with more than ten paragraphs, to avoid “ad irritability” — too many ads crammed in a small spot create aversion to your site — since you don’t want that, the plugin avoids it.
Finally: with this plugin, you can even assign different ad code for the opener and halfway ad slots. Practical if you’re using something like AdSense channels to track performance of different ad spots.
Key point #2: A/B testing
What’s A/B testing?
I like to phrase it as “pitting two (or more) contenders in equal conditions”. Truth is, much of your success with online publishing will depend on A/B testing, so you better get started now. And the perfect vehicle to do so is, appropriately, advertisements.
What you need to perform A/B testing
In A/B testing, no matter how simple or complex your test is, there are two indispensable tools you need:
- Several alternatives.
- A way to rotate (equally and randomly) among alternatives.
- A way to measure the performance of each alternative.
In online advertising, 1) translates to variations of an ad you want to test, 2) to a software mechanism that rotates ad code, while 3) translates to an ad tracking device. To make things simple, our thought experiment will use AdSense channels, so for 1) and 3) you’lld use the AdSense tools to create several variations of the ads, and for each variation, you will create and assign one channel.
Using the Intelligent ad content insertion plugin to perform A/B testing
Now that it’s time to perform testing, let’s assume you have three (you better have at least ten!) different ad variations, each with its own color palette, borders, orientation, decorations and positioning (easily accomplished by surrounding the ad with
This code can get you started:
[replace this with ad code for variation 1 here][replace this with ad code for variation 2 here][replace this with ad code for variation 3 here]
What this code basically does is select a number randomly from 1 to 3 and, based on the choice, print out a different ad variation.
After you’ve done that, you need to take two more steps:
- Enable PHP evaluation on the plugin options below the ad code boxes.
- Let the test run for a few days. Preferably a week.
Voilà! After a week, you will be able to generate an AdSense report comparing the performance of each one of the alternatives. Ditch all except for the highest-performing one, rinse and repeat with new variations. If you’re like me, you will probably identify one or two “winning characteristics” that you’ll want to keep for the next testing round.
Conclusion
Positioning and A/B testing are key if you want to make serious money with your blog. The Intelligent content ad insertion plugin for WordPress helps you do both painlessly. Get it today — it’s free.